Is browsing always slow in Internet Explorer? Does it frequently stop responding (hang), or stop working (crash)? Do you receive error messages that indicate that Internet Explorer has "encountered a problem and needs to close"? Or that a Visual C++ "runtime error" has occurred in Iexplore.exe?
If so, then you might want to try resetting Internet Explorer. When you reset Internet Explorer settings, all add-ons and customizations are deleted, and you basically start with a fresh version of Internet Explorer. This article helps you reset Internet Explorer.
Fix this problem
Microsoft Fix it 50195
Note This fix does not work in Windows 7. Instead, you can use the Internet Explorer troubleshooters to achieve this automatically.
Note This wizard may be in English only; however, the automatic fix also works for other language versions of Windows.
Note If you are not on the computer that has the problem, you can save the automatic fix to a flash drive or to a CD, and then you can run it on the computer that has the problem.
If the problem is caused by damaged or incompatible Internet Explorer settings or add-ons, you can usually resolve the problem by resetting Internet Explorer settings.
To use the Reset Internet Explorer Settings feature from Control Panel, follow these steps:
Exit all programs, including Internet Explorer (if it is running).
If you use Windows XP, click Start, and then click Run. Type the following command in the Open box, and then press ENTER:
inetcpl.cpl
If you use Windows Vista, click StartCollapse this imageExpand this image. Type the following command in the Start Search box, and then press ENTER:
inetcpl.cpl
The Internet Options dialog box appears.
Click the Advanced tab.
Under Reset Internet Explorer settings, click Reset. Then click Reset again.
When Internet Explorer finishes resetting the settings, click Close in the Reset Internet Explorer Settings dialog box.
Start Internet Explorer again.
To reset Internet Explorer automatically, click the Fix this problem link. Then click Run in the File Download dialog box, and follow the steps in this wizard.

2010/02/25
2010/02/12
Update Rollup 9 for Microsoft Dynamics CRM 4.0
Update Rollup 9 for Microsoft Dynamics CRM 4.0 resolves the following issues that were not previously documented in a Knowledge Base article:
• When a user runs code that uses the RetrieveAllChildUsersSystemUserRequest method to find the direct reports of another user, you receive the following error message:
The value passed for ConditionOperator.In is empty.
This problem occurs if the user who runs the code is not a manager.
• After you import customizations from Microsoft Dynamics CRM Online to Microsoft Dynamics CRM 4.0, Microsoft Dynamics CRM 4.0 incorrectly uses the SystemUser entity form that is used in Microsoft Dynamics CRM Online.
• Assume that you use Microsoft Dynamics CRM 4.0 in the Internet-Facing Deployment (IFD) mode. When you export data from Microsoft Dynamics CRM 4.0 to an Microsoft Excel worksheet as a dynamic worksheet, a PrimaryKey column of entities is not exported to the Excel worksheet. For example, when you export contacts to an Excel worksheet, the ContactId column is not exported to the Excel worksheet.
• Assume that you enable the Secure Sockets Layer (SSL) setting in Internet Explorer 6. When you use Internet Explorer 6 to run Microsoft Dynamics CRM 4.0, you receive the following security warning message:
This page contains both secure and nonsecure items.
This problem occurs when you create a new report or when you run the Duplicate Detection function.
• Consider the following scenario:
o You run a mail merge process for marketing e-mail messages in the Microsoft dynamics CRM 4.0 client for Outlook.
o The merged e-mail message is addressed to a lead.
o In this e-mail message, you specify an unsubscribing link so that the lead can unsubscribe the marketing materials.
In this scenario, Microsoft Dynamics CRM 4.0 does not consider the unsubscribing request when the lead sends an unsubscribing e-mail message by clicking the link.
• Assume that you use the InvalidPluginExecutionException handler in a custom plug-in and you specify a custom exception message for the handler. When you upload an attachment to a Microsoft Dynamics CRM record, you receive the following exception message:
File Could Not Be Uploaded.
You expect to receive the custom exception message that you specified.
• Consider the following scenario. You select to use the Custom option when you install Microsoft Dynamics CRM 4.0. Then, you click Next, you click Back, and then you select to use the Typical option to install Microsoft Dynamics CRM 4.0. In this scenario, the Platform Server role is deleted when you run the Repair process during the installation of Microsoft Dynamics CRM 4.0.
• Consider the following scenario:
o You use a domain account for the CRMAppPool application pool.
o You enable the Microsoft Dynamics CRM tracing.
In this scenario, the following error message for the domain account is logged in the Application log several times:
User Was Not Found.
• Assume that you use the ISO-2022-JP encoding for POP3 e-mail messages. When the Microsoft Dynamics CRM E-Mail Router tracks an e-mail message, you notice garbage characters in the e-mail message.
• Consider the following scenario:
o You create a workflow to send an e-mail message that uses an e-mail template.
o The template contains HTML code.
o You run the workflow.
In this scenario, the e-mail message is displayed as plain text without HTML code.
• When you include the address of a recipient in an e-mail message by using single straight quotation marks (''), the e-mail message cannot be tracked in Microsoft Dynamics CRM 4.0.
• When you use a lookup field to update a record in an entity form, the corresponding note information does not appear in the entity form.
• If you block the ActiveX control by using the CLSID value "{00000000-0000-0000-0000-000000000000}," you cannot log on to the Microsoft Dynamics CRM 4.0 Web client. Additionally, you are redirected to the following Web page:
http://common/error/unsupportedSecurity.aspx
• You cannot receive all e-mail messages in Microsoft Dynamics CRM 4.0 if the mail server uses a time setting that differs from the time setting that is used by the Microsoft Dynamics CRM E-mail Router.
• The resource name unexpectedly changes to "Selection Rule" after you save a service activity.
• Assume that you create a record in the Phone Call form in Microsoft Dynamics CRM for Microsoft Office Outlook with Offline Access. When you change the Direction value of the record, you receive the following error message:
A record with these values already exists. A duplicate record cannot be created. Select one or more unique values and try again.
• When multiple levels of menus are displayed in the Microsoft Dynamics CRM 4.0 Web client, the sub menus are displayed behind the main menus. This problem occurs if you use Microsoft Internet Explorer 8.0.
• When a user runs code that uses the RetrieveAllChildUsersSystemUserRequest method to find the direct reports of another user, you receive the following error message:
The value passed for ConditionOperator.In is empty.
This problem occurs if the user who runs the code is not a manager.
• After you import customizations from Microsoft Dynamics CRM Online to Microsoft Dynamics CRM 4.0, Microsoft Dynamics CRM 4.0 incorrectly uses the SystemUser entity form that is used in Microsoft Dynamics CRM Online.
• Assume that you use Microsoft Dynamics CRM 4.0 in the Internet-Facing Deployment (IFD) mode. When you export data from Microsoft Dynamics CRM 4.0 to an Microsoft Excel worksheet as a dynamic worksheet, a PrimaryKey column of entities is not exported to the Excel worksheet. For example, when you export contacts to an Excel worksheet, the ContactId column is not exported to the Excel worksheet.
• Assume that you enable the Secure Sockets Layer (SSL) setting in Internet Explorer 6. When you use Internet Explorer 6 to run Microsoft Dynamics CRM 4.0, you receive the following security warning message:
This page contains both secure and nonsecure items.
This problem occurs when you create a new report or when you run the Duplicate Detection function.
• Consider the following scenario:
o You run a mail merge process for marketing e-mail messages in the Microsoft dynamics CRM 4.0 client for Outlook.
o The merged e-mail message is addressed to a lead.
o In this e-mail message, you specify an unsubscribing link so that the lead can unsubscribe the marketing materials.
In this scenario, Microsoft Dynamics CRM 4.0 does not consider the unsubscribing request when the lead sends an unsubscribing e-mail message by clicking the link.
• Assume that you use the InvalidPluginExecutionException handler in a custom plug-in and you specify a custom exception message for the handler. When you upload an attachment to a Microsoft Dynamics CRM record, you receive the following exception message:
File Could Not Be Uploaded.
You expect to receive the custom exception message that you specified.
• Consider the following scenario. You select to use the Custom option when you install Microsoft Dynamics CRM 4.0. Then, you click Next, you click Back, and then you select to use the Typical option to install Microsoft Dynamics CRM 4.0. In this scenario, the Platform Server role is deleted when you run the Repair process during the installation of Microsoft Dynamics CRM 4.0.
• Consider the following scenario:
o You use a domain account for the CRMAppPool application pool.
o You enable the Microsoft Dynamics CRM tracing.
In this scenario, the following error message for the domain account is logged in the Application log several times:
User Was Not Found.
• Assume that you use the ISO-2022-JP encoding for POP3 e-mail messages. When the Microsoft Dynamics CRM E-Mail Router tracks an e-mail message, you notice garbage characters in the e-mail message.
• Consider the following scenario:
o You create a workflow to send an e-mail message that uses an e-mail template.
o The template contains HTML code.
o You run the workflow.
In this scenario, the e-mail message is displayed as plain text without HTML code.
• When you include the address of a recipient in an e-mail message by using single straight quotation marks (''), the e-mail message cannot be tracked in Microsoft Dynamics CRM 4.0.
• When you use a lookup field to update a record in an entity form, the corresponding note information does not appear in the entity form.
• If you block the ActiveX control by using the CLSID value "{00000000-0000-0000-0000-000000000000}," you cannot log on to the Microsoft Dynamics CRM 4.0 Web client. Additionally, you are redirected to the following Web page:
http://common/error/unsupportedSecurity.aspx
• You cannot receive all e-mail messages in Microsoft Dynamics CRM 4.0 if the mail server uses a time setting that differs from the time setting that is used by the Microsoft Dynamics CRM E-mail Router.
• The resource name unexpectedly changes to "Selection Rule" after you save a service activity.
• Assume that you create a record in the Phone Call form in Microsoft Dynamics CRM for Microsoft Office Outlook with Offline Access. When you change the Direction value of the record, you receive the following error message:
A record with these values already exists. A duplicate record cannot be created. Select one or more unique values and try again.
• When multiple levels of menus are displayed in the Microsoft Dynamics CRM 4.0 Web client, the sub menus are displayed behind the main menus. This problem occurs if you use Microsoft Internet Explorer 8.0.


2010/02/10
Editing the CRM Site Map made so easy!!!!...
Launch the MSDYCRM4.0_Demonstration Tools.exe
Use the Site Map Editor to modify the contents of the Microsoft Dynamics CRM Navigation Pane. You can use the editor to move, add, or delete items from the navigation pane.
NOTE: It’s strongly recommended that you back up your CRM data before using this tool.
• Select the hyperlink “The application is not yet connected to Microsoft Dynamics CRM, Click here to connect”. Located on the top of the page as shown below .

• Complete the login credentials and press “connect”
• Select the correct Organization from the dropdown
Modify the Existing CRM Navigation Pane
To load and edit the current Navigation Pane for CRM:
1. Under Available Tools, click Site Map Editor.
Load the sitemap from CRM by selecting “Open from CRM”
Under Open and Save, click Open from CRM.
 The site map appears as a tree in the Edit Site Map box.
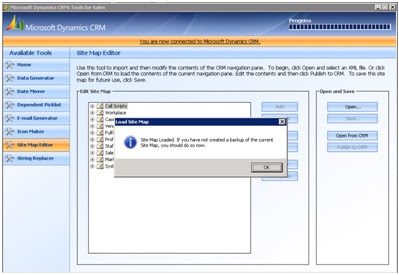 To add a navigational section like sales, marketing select add. This will add a section to your crm navigational pane.
Add an Organizational group
Adding a group under the section select add Under
To add a group underneath the section just created, select the group created and select the option “Add Under”. This will allow you to add a group.To display all the groups underneath the main section select the tick box for display groups.)This will use a lot of real-estate under your navigation pane.)
To link a entity or call a url being on the select group you added select “Add Under”.
Groups organize sub-areas for usability purposes. To add a group:
1. In the site map tree, select the entity underwhich you want to add the group, and then click Add Under.
2. In the Add Group dialog, under Name, enter the title for this group. Then click OK.
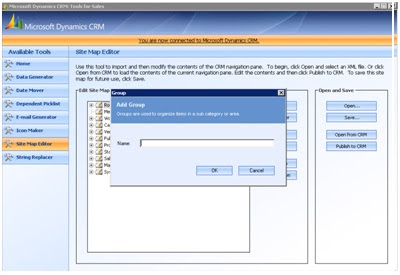
Sub-areas bring up the actual user interface for accomplishing tasks, such as a website or the lists/forms associated with an entity. To create a subarea:
1. In the site map tree, select a group and then click Add Under or select an existing subarea and click Add Under or Add (to add the new subarea above the selected subarea).
2. In the Sub-Area dialog:
• Under Entity, select the entity to add as a sub-area.
• Under URL, enter the URL to add as a sub-area. Click the Test URL link to verify the URL can be accessed. If you selected URL:
o Under Name, enter the user-friendly name that should appear in the Navigation Pane for this URL.
o Under Icon, enter a URL specifying the location for a graphic file that will act as the icon for this sub-area. Graphics files may be .png, .gif, .bmp, or .jpg files.

Modify Existing Areas, Groups, and Subareas
You can edit the site map to modify the properties of existing items, move them, and delete them:
Edit items
Select the item you want to edit and then click Edit. Change the title or other information for the item.
Remove items
Select the item you want to remove and then click Remove. If you select an area or a group, all of the items under the area and group will also be removed.
Move items
To move an item up or down, select the item and then click Move Up or Move Down. Areas are moved relative to the nearest area. Groups are moved relative to the nearest group. For example, if you select a group and click Move Down, the group and all its subordinate items will move under the next group. Sub-areas are moved relative to the nearest sub-area, but within their group.
Select Publish to CRM to test the changes.
After you’ve modified the site map to reflect the Navigation Pane you want to see in the application, you must publish it:
• On the Site Map Editor page, after you have created the site map, under Open and Save, click Publish to CRM.
Save a Site Map for Future Use
You can save the site map you’ve created for future use. To save the site map:
1. On the Site Map Editor page, after you have created the site map, under Open and Save, click Save.
2. In the Save dialog, specify the location and filename for the new XML file. Then click OK.

Hides the associated Views buttons/More Actions menu drop down
/* Hides the associated Views buttons. i.e Hides the add existing button. */
/* NB: If called multiple times, the settings of the previous calls are overwritten by the final one! */
/* A menu element on the "More actions" drop-down menu can be hidden
* by adding a string such as 'More Actions::Activate' to the buttonTitles array.
*/
HideAssociatedViewButtons = function(loadAreaId, buttonTitles)
{
var navElement = document.getElementById('nav_' + loadAreaId);
if (navElement != null)
{
navElement.onclick = function LoadAreaOverride()
{
// Call the original CRM method to launch the navigation link and create area iFrame
loadArea(loadAreaId);
HideViewButtons(document.getElementById(loadAreaId + 'Frame'), buttonTitles);
}
}
}
/* Used internally by the 'HideAssociatedViewButtons' method */
HideViewButtons = function(Iframe, buttonTitles)
{
if (Iframe != null)
{
Iframe.onreadystatechange = function HideTitledButtons()
{
if (Iframe.readyState == 'complete')
{
var iFrame = frames[window.event.srcElement.id];
var liElements = iFrame.document.getElementsByTagName('li');
for (var j = 0; j < buttonTitles.length; j++)
{
buttonTitleParts = buttonTitles[j].split('::');
if (buttonTitleParts.length > 0)
{
buttonTitle = buttonTitleParts[0];
for (var i = 0; i < liElements.length; i++)
{
liElement = liElements[i];
if (liElement.getAttribute('title') == buttonTitle)
{
if (buttonTitleParts.length == 1)
{
liElement.style.display = 'none';
break;
}
else
{
/* We want to hide a menu item in a drop-down menu.
Find the descendant text element with the specified text.
Then find its parent list item and hide it:
*/
menuText = buttonTitleParts[1];
var spanElements = liElement.getElementsByTagName('span');
for (var k = 0; k < spanElements.length; k++)
{
spanElement = spanElements[k];
if (spanElement.className == 'ms-crm-MenuItem-Text' )
{
textElement = spanElement.firstChild;
if (textElement != null && textElement.nodeType == 3) /* 3 = Node.TEXT_NODE */
{
if (textElement.data == menuText)
{
liMenuItemElement
= spanElement.parentNode.parentNode.parentNode;
liMenuItemElement.style.display = 'none';
break;
}
}
}
}
}
}
}
}
}
}
}
}
}
/* NB: If called multiple times, the settings of the previous calls are overwritten by the final one! */
/* A menu element on the "More actions" drop-down menu can be hidden
* by adding a string such as 'More Actions::Activate' to the buttonTitles array.
*/
HideAssociatedViewButtons = function(loadAreaId, buttonTitles)
{
var navElement = document.getElementById('nav_' + loadAreaId);
if (navElement != null)
{
navElement.onclick = function LoadAreaOverride()
{
// Call the original CRM method to launch the navigation link and create area iFrame
loadArea(loadAreaId);
HideViewButtons(document.getElementById(loadAreaId + 'Frame'), buttonTitles);
}
}
}
/* Used internally by the 'HideAssociatedViewButtons' method */
HideViewButtons = function(Iframe, buttonTitles)
{
if (Iframe != null)
{
Iframe.onreadystatechange = function HideTitledButtons()
{
if (Iframe.readyState == 'complete')
{
var iFrame = frames[window.event.srcElement.id];
var liElements = iFrame.document.getElementsByTagName('li');
for (var j = 0; j < buttonTitles.length; j++)
{
buttonTitleParts = buttonTitles[j].split('::');
if (buttonTitleParts.length > 0)
{
buttonTitle = buttonTitleParts[0];
for (var i = 0; i < liElements.length; i++)
{
liElement = liElements[i];
if (liElement.getAttribute('title') == buttonTitle)
{
if (buttonTitleParts.length == 1)
{
liElement.style.display = 'none';
break;
}
else
{
/* We want to hide a menu item in a drop-down menu.
Find the descendant text element with the specified text.
Then find its parent list item and hide it:
*/
menuText = buttonTitleParts[1];
var spanElements = liElement.getElementsByTagName('span');
for (var k = 0; k < spanElements.length; k++)
{
spanElement = spanElements[k];
if (spanElement.className == 'ms-crm-MenuItem-Text' )
{
textElement = spanElement.firstChild;
if (textElement != null && textElement.nodeType == 3) /* 3 = Node.TEXT_NODE */
{
if (textElement.data == menuText)
{
liMenuItemElement
= spanElement.parentNode.parentNode.parentNode;
liMenuItemElement.style.display = 'none';
break;
}
}
}
}
}
}
}
}
}
}
}
}
}
2010/02/03
Adding tooltips to CRM and help developers getting the attribute name using the tooltip
Found the wonderful post from Andriy on his blog Setting the description field of the attribute as a tooltip in CRM.
We changed the code a bit to make it easier for developers to access the attribute name based on the field's tooltip.
Step 1: Copy the code in onload event of the form at the bottom of the post.
Step 2:Publish the changes
Step 3:Load the relevant page
Step 4:Click with your mouse on the display name of attribute
Step 6: Open Notepad
Step 7: press (Crtl +v) and the database name will be pasted in notepad.
SetTooltips = function() {
try {
var request = "" +
"<?xml version="1.0" encoding="utf-8"?>" +
"<soap:Envelope xmlns:soap="http://schemas.xmlsoap.org/soap/envelope/" xmlns:xsi="http://www.w3.org/2001/XMLSchema-instance" xmlns:xsd="http://www.w3.org/2001/XMLSchema">" +
GenerateAuthenticationHeader() +
" <soap:Body>" +
" <Execute xmlns="http://schemas.microsoft.com/crm/2007/WebServices">" +
" <Request xsi:type="RetrieveEntityRequest">" +
" <RetrieveAsIfPublished>true</RetrieveAsIfPublished>" +
" <EntityItems>IncludeAttributes</EntityItems>" +
" <LogicalName>" + crmForm.ObjectTypeName + "</LogicalName>" +
" </Request>" +
" </Execute>" +
" </soap:Body>" +
"</soap:Envelope>";
var xmlHttpRequest = new ActiveXObject("Msxml2.XMLHTTP");
xmlHttpRequest.Open("POST", "/mscrmservices/2007/MetadataService.asmx", false);
xmlHttpRequest.setRequestHeader("SOAPAction", "http://schemas.microsoft.com/crm/2007/WebServices/Execute");
xmlHttpRequest.setRequestHeader("Content-Type", "text/xml; charset=utf-8");
xmlHttpRequest.setRequestHeader("Content-Length", request.length);
xmlHttpRequest.send(request);
var result = xmlHttpRequest.responseXML;
for (var i = 0; i < crmForm.all.length; i++)
if (crmForm.all[i].title != null && crmForm.all[i].title != 'undefined') {
var fieldName = crmForm.all[i].id;
var desc = result.selectSingleNode("//EntityMetadata/Attributes/Attribute[LogicalName='" + fieldName + "']/Description/UserLocLabel/Label");
try {
if (desc != null) {
crmForm.all[fieldName + '_c'].title = desc.nodeTypedValue;
crmForm.all[fieldName + '_d'].title = desc.nodeTypedValue;
}
crmForm.all[fieldName + '_c'].children[0].onclick = function() { copyFieldNameToClipboard(fieldName) };
}
catch (e) { }
}
} catch (e) {
}
function copyFieldNameToClipboard(fieldName) {
if (event.srcElement.tagName.toLowerCase() == 'label' && event.ctrlKey)
clipboardData.setData('text', event.srcElement.attributes['for'].value);
}
}
setTimeout('SetTooltips();', 1500);
We changed the code a bit to make it easier for developers to access the attribute name based on the field's tooltip.
Step 1: Copy the code in onload event of the form at the bottom of the post.
Step 2:Publish the changes
Step 3:Load the relevant page
Step 4:Click with your mouse on the display name of attribute

Step 6: Open Notepad
Step 7: press (Crtl +v) and the database name will be pasted in notepad.

SetTooltips = function() {
try {
var request = "" +
"<?xml version="1.0" encoding="utf-8"?>" +
"<soap:Envelope xmlns:soap="http://schemas.xmlsoap.org/soap/envelope/" xmlns:xsi="http://www.w3.org/2001/XMLSchema-instance" xmlns:xsd="http://www.w3.org/2001/XMLSchema">" +
GenerateAuthenticationHeader() +
" <soap:Body>" +
" <Execute xmlns="http://schemas.microsoft.com/crm/2007/WebServices">" +
" <Request xsi:type="RetrieveEntityRequest">" +
" <RetrieveAsIfPublished>true</RetrieveAsIfPublished>" +
" <EntityItems>IncludeAttributes</EntityItems>" +
" <LogicalName>" + crmForm.ObjectTypeName + "</LogicalName>" +
" </Request>" +
" </Execute>" +
" </soap:Body>" +
"</soap:Envelope>";
var xmlHttpRequest = new ActiveXObject("Msxml2.XMLHTTP");
xmlHttpRequest.Open("POST", "/mscrmservices/2007/MetadataService.asmx", false);
xmlHttpRequest.setRequestHeader("SOAPAction", "http://schemas.microsoft.com/crm/2007/WebServices/Execute");
xmlHttpRequest.setRequestHeader("Content-Type", "text/xml; charset=utf-8");
xmlHttpRequest.setRequestHeader("Content-Length", request.length);
xmlHttpRequest.send(request);
var result = xmlHttpRequest.responseXML;
for (var i = 0; i < crmForm.all.length; i++)
if (crmForm.all[i].title != null && crmForm.all[i].title != 'undefined') {
var fieldName = crmForm.all[i].id;
var desc = result.selectSingleNode("//EntityMetadata/Attributes/Attribute[LogicalName='" + fieldName + "']/Description/UserLocLabel/Label");
try {
if (desc != null) {
crmForm.all[fieldName + '_c'].title = desc.nodeTypedValue;
crmForm.all[fieldName + '_d'].title = desc.nodeTypedValue;
}
crmForm.all[fieldName + '_c'].children[0].onclick = function() { copyFieldNameToClipboard(fieldName) };
}
catch (e) { }
}
} catch (e) {
}
function copyFieldNameToClipboard(fieldName) {
if (event.srcElement.tagName.toLowerCase() == 'label' && event.ctrlKey)
clipboardData.setData('text', event.srcElement.attributes['for'].value);
}
}
setTimeout('SetTooltips();', 1500);
2010/02/01
Cannot add users in crm using "Add Multiple Users"
Please see below for the solution :
If you do have more than one, please add a String: "PreferredDC" to the MSCRM hive in the registry on the CRM Server (HKLM - software - Microsoft - MSCRM) Add in the FQDN of the domain controller within your environment which holds the user domain accounts.
Change the Search order in the registry of the CRM server and point to Your Primary Domain Controller. To do this make the following registry change: HKEY_LOCAL_MACHINE\SYSTEM\CurrentControlSet\Services\Tcpip\Parameters]"SearchList"= DCName. Change the "DCName" to your Primary Domain Controllers name You should use the FQDN of the Domain Controller where the DNS Server is held and where the CRM Domain accounts are. You MUST reboot the CRM Server in order for these change to take effect.
If you do have more than one, please add a String: "PreferredDC" to the MSCRM hive in the registry on the CRM Server (HKLM - software - Microsoft - MSCRM) Add in the FQDN of the domain controller within your environment which holds the user domain accounts.
Change the Search order in the registry of the CRM server and point to Your Primary Domain Controller. To do this make the following registry change: HKEY_LOCAL_MACHINE\SYSTEM\CurrentControlSet\Services\Tcpip\Parameters]"SearchList"= DCName. Change the "DCName" to your Primary Domain Controllers name You should use the FQDN of the Domain Controller where the DNS Server is held and where the CRM Domain accounts are. You MUST reboot the CRM Server in order for these change to take effect.
2010/01/29
Adding sort order to the custom entities tab for security roles in MS CRM
HI Guys/Girls!
We are busy with a huge crm implementation and currently have about 200 custom entities.
When we started to look at the security model for the system and it became a nightmare to set the privileges on the security roles as CRM does not sort the custom entities alphabetically.
So what to DO?
We hack!...
How the solution works:
Locate the file called edit.aspx located at:
[drive]Program Files\Microsoft Dynamics CRM\CRMWeb\Biz\Roles\edit.aspx
Between the script tags at the bottom of the page.(As shown below)
<script>
var tbl = document.getElementById('tab7').children(0).children(0).children(0).children(0).children(0);
var x = [];
for (var i = 0; i < tbl.rows.length; i++)
x[i] = [tbl.rows[i].cells[0].innerHTML,tbl.rows[i].outerHTML];
var str = x[0][1];
for (var i = 1; i < x.length-1; i++)
for (var j = i+1; j < x.length; j++)
if (x[i][0] > x[j][0]) {
var tmp = x[j];
x[j] = x[i];
x[i] = tmp;
}
for (var i = 1; i < x.length; i++)
str += x[i][1];
document.getElementById('tab7').children(0).children(0).children(0).children(0).innerHTML = '<TABLE class=ms-crm-Form-Area onmouseover=SetAltText(); ondblclick=ProcessClick(); onclick=ProcessClick(); cellSpacing=0 cellPadding=2>' + str + '</table>';
</script>
Copy and paste the code above into the file or download the file here.
And there you go!, a neat sort order for all your custom entities.
The code can be adopted for the other tabs as well just make a back of your edit.aspx file.
This is a unsupported customization!!!!!! so make a copy of the original file first!
We are busy with a huge crm implementation and currently have about 200 custom entities.
When we started to look at the security model for the system and it became a nightmare to set the privileges on the security roles as CRM does not sort the custom entities alphabetically.
So what to DO?
We hack!...
How the solution works:
Locate the file called edit.aspx located at:
[drive]Program Files\Microsoft Dynamics CRM\CRMWeb\Biz\Roles\edit.aspx
Between the script tags at the bottom of the page.(As shown below)
<script>
var tbl = document.getElementById('tab7').children(0).children(0).children(0).children(0).children(0);
var x = [];
for (var i = 0; i < tbl.rows.length; i++)
x[i] = [tbl.rows[i].cells[0].innerHTML,tbl.rows[i].outerHTML];
var str = x[0][1];
for (var i = 1; i < x.length-1; i++)
for (var j = i+1; j < x.length; j++)
if (x[i][0] > x[j][0]) {
var tmp = x[j];
x[j] = x[i];
x[i] = tmp;
}
for (var i = 1; i < x.length; i++)
str += x[i][1];
document.getElementById('tab7').children(0).children(0).children(0).children(0).innerHTML = '<TABLE class=ms-crm-Form-Area onmouseover=SetAltText(); ondblclick=ProcessClick(); onclick=ProcessClick(); cellSpacing=0 cellPadding=2>' + str + '</table>';
</script>
Copy and paste the code above into the file or download the file here.
And there you go!, a neat sort order for all your custom entities.
The code can be adopted for the other tabs as well just make a back of your edit.aspx file.
This is a unsupported customization!!!!!! so make a copy of the original file first!
2009/10/27
CRM 4.0 Disaster Recovery
1. Backup requirements summary
Backup requirements vary according to the servers involved. The following table is a summary of what to back up for Microsoft Dynamics CRM.
Server What to back up for Microsoft Dynamics CRM Comments
Domain controller Full System State None.
Exchange Server Backup not required by Microsoft Dynamics CRM. Backup may be required for Exchange.
SQL Server MSCRM_CONFIG
OrganizationName_MSCRM
master
msdb
ReportServer
ReportServertempdb Backup should be done by using Reporting Services. The OrganizationName_MSCRM and ReportServer databases should have full database backups and transaction log backups. For databases that are rarely updated, such as msdb and MSCRM_CONFIG, you may select only full database backup. Backup of the master and msdb databases are not required by Microsoft Dynamics CRM but should be part of an overall backup strategy.
Microsoft Dynamics CRM Server web.config
(Default location: c:\Inetpub\wwwroot)
Windows registry:
HKEY_LOCAL_MACHINE\SOFTWARE\Microsoft\MSCRM The web.config file is required only if the file has been changed from the default settings. The file location assumes the installation occurred at the Default Web site.
Windows registry subkey.
1.1 Selecting a backup model
When you back up to tape, we recommend that you select a tape backup rotation model that guarantees data protection in case a tape malfunctions or loss. When backing up to disk, you can implement similar logic for rotating disk files. A popular tape rotation scheme is grandparent-parent-child:
• The tape used for backup on the last Friday of each month is called the grandparent tape. This tape is stored off-site.
• The tape used for backup every Friday (except the last Friday of the month) is called the parent tape. This tape is also stored off-site.
• The tapes used for backup on Monday, Tuesday, Wednesday, and Thursday are called child tapes. Frequently all child tapes are stored on-site except for the tape from the previous day.
The following backup options are available when you use the Microsoft Backup and Restore Wizard:
• Normal. Backs up all selected files and marks the files as backed up.
• Copy. Backs up all selected files, but does not mark the files as backed up.
• Differential. Backs up selected files, only if they have not been previously backed up, or changed since the last backup, but does not mark the files as backed up.
• Incremental. Backs up selected files, only if they have not been previously backed up, or changed, since the last backup, and marks the files as backed up.
• Daily. Backs up only files that have been changed, on that particular day, and marks them as backed up.
Because many small businesses typically do not have system administrators on staff, a regular backup, which is performed daily and according to the suggested grandparent-parent-child backup model, is recommended for small organizations. Larger organizations likely have an existing backup methodology that Microsoft Dynamics CRM will fit into.
1.2 Backing up Windows Server 2003
Windows Server 2003 has a comprehensive backup utility that lets you back up important company data to disk or tape media. The scheduling capability found in the Backup and Restore Wizard provides data backup for the server itself and workstations in the small business network. The data backed up includes security information, file and share permissions, and registry data. For data security, only a member of the Administrators or Backup Operators group can perform a backup. Individual files and directories on the server can be restored by using the Backup and Restore Wizard.
When you back up to tape, the Backup and Restore Wizard requires that the tape backup device be connected to a compatible SCSI or non-SCSI controller card. The controller card must be installed correctly and functional. Windows Server 2003 automates the installation of a controller card because the new hardware is detected at system startup and the correct drivers are automatically installed.
1.3 Backing up Active Directory
The Backup and Restore Wizard can back up System State data, which includes Active Directory, system startup files, the Component Services Class Registration database, the registry, and SysVol. Possible backup locations for System State data include floppy disks, hard disks, removable media, recordable compact discs, and tapes.
Although we recommend that you back up Active Directory, the only way to avoid data loss is to have multiple Active Directory domain controllers. Then, if a domain controller fails, the other domain controllers will have a complete copy of the directory. With a tape backup, you have data only as recent as your last backup.
Active Directory is a transacted database system that uses log files that support roll-back semantics to make sure that transactions are committed to the database. The files associated with Active Directory are as follows:
• Ntds.dit. The database.
• Edbxxxxx.log. Transaction logs.
• Edb.chk. Checkpoint file.
• Res1.log and Res2.log. Reserved log files.
Ntds.dit grows as the database fills up. However, the logs are of fixed size (10 MB). Any change made to the database is also appended to the current log file, and its disk image is always kept up to date.
Edb.log is the current log file. When a change is made to the database, it is written to the Edb.log file. When the Edb.log file is full of transactions, it is renamed to Edbxxxxx.log. (It starts at 00001 and continues to increment by using hexadecimal notation.) Because Active Directory uses circular logging, old log files are constantly deleted as soon as they have been written to the database. At any point in time, you will have the Edb.log file and maybe one or more Edbxxxxx.log files.
The Edb.chk file stores the database checkpoint, which identifies the point where the database engine has to replay the logs, generally at the time of recovery or initialization.
Res1.log and Res2.log are "placeholders," designed to reserve (in this case) the last 20 MB of disk space. This gives the log files sufficient room for a graceful shutdown if all other disk space is consumed.
1.4 Backing up SQL Server, including Reporting Services
The Backup and Restore Wizard in Windows Server 2003 cannot back up SQL Server databases that are online, instead you must first stop the MSSQLSERVER service. A better solution that can be used while SQL Server runs is the built-in backup. Use SQL Server 2005 Management Studio to create a backup of the SQL Server databases. Then, you can run a backup job from the Backup and Restore Wizard to include database backups that Reporting Services created. You would schedule the backup routing in Reporting Services to run first, followed by a backup job run in the Backup and Restore Wizard. For more information about SQL Server backups, see Backing up and Restoring Databases in SQL Server Books Online.
Microsoft Dynamics CRM creates at least two Microsoft Dynamics CRM-specific databases on SQL Server. In addition, Microsoft Dynamics CRM requires the default master and msdb SQL Server databases for database services and the default report server SQL Server databases for Reporting Services. The databases that make up a Microsoft Dynamics CRM system on SQL Server are as follows:
• OrganizationName_MSCRM
• MSCRM_CONFIG
• ReportServer
• ReportServertempdb
• master
• msdb
Note
Your Microsoft Dynamics CRM deployment may include more than one OrganizationName_MSCRM database.
The SQL Server backup plan should address each of these databases to make sure that Microsoft Dynamics CRM could recover if one, or all, databases fail. If your organization already has SQL Server or another database application, your database administrator may have a database backup strategy. However, if this is the first database application in your organization, you can create and maintain scheduled backup jobs to perform the necessary backups by using the Maintenance Plan Wizard in SQL Server 2005 Management Studio. To start the Maintenance Plan Wizard, in Reporting Services, expand the server, expand the Management folder, right-click the Maintenance Plans folder, and then click Maintenance Plan Wizard.
Your backup plan for the Microsoft Dynamics CRM databases provides you a backup set that includes a full database backup and some number of transaction log backups, depending on the Microsoft Dynamics CRM installation and the frequency with which you determine whether you must have backups. For more information about backup and restore strategies, see SQL Server Books Online.
For databases that are updated infrequently, such as msdb and MSCRM_CONFIG, you might perform only full database backups. The OrganizationName_MSCRM and ReportServer databases should have both full database and transaction-log backups
Databases on which transaction log backups will be performed must have the Full recovery model database property set. You can set this property through SQL Server 2005 Management Studio. For more information about how to set database properties, see "How to Change the Configuration Settings for a Database" in SQL Server Books Online.
Schedule full database backups frequently enough to reduce the number of restores after a failure. For example, if one day's data loss is acceptable, you can back up the transaction log one time per day, and back up the database one time per week. If only one hour's maximum data loss is acceptable, you can back up the transaction log one time per hour. To reduce the number of restores, back up the database one time per day.
To create a database maintenance plan for scheduled backups, run the Maintenance Plan Wizard from SQL Server 2005 Management Studio. Select the option to back up the database as part of the maintenance plan for a full database backup. Select the option to back up the transaction log as part of the maintenance plan for a transaction log backup.
Your computer that is running SQL Server should also be designed with a level of fault-tolerance that is correct for a database server. This includes a RAID-5 disk array for your databases and a RAID-0 (mirror) for your transaction logs. With the correct level of hardware fault-tolerance, restoring from backup should be a very uncommon occurrence.
1.5 Backing up Exchange Server 2003 and Exchange Server 2007
The Backup and Restore Wizard in Windows Server 2003 can back up the Exchange Server 2003 or Exchange Server 2007 Information Store and directory services databases. Backing up the Exchange Information Store is an important part of creating a fault-tolerant messaging system. The backup and restore features in Exchange Server help you recover from various types of data loss with minimal downtime for your e-mail system.
Exchange Server uses the Backup and Restore Wizard to back up and restore the Exchange Information Store. The wizard helps you protect data from accidental loss or hardware and media failure by using a storage device to back up and restore data on any server in your organization locally, or over the network.
Improvements in Exchange Server make sure that backing up and restoring data is efficient and reliable. For example, you can restore one or more mailbox stores, or public folder stores, without shutting down the Information Store.
You can make sure that your organization is prepared to recover from data loss by performing the necessary planning and implementation. Developing a backup and restoration strategy consists of the following steps:
1. Understand Exchange Server database and storage group technology.
2. Design a backup plan.
3. Develop failure-recovery strategies.
4. Restore data.
The Microsoft Dynamics CRM E-mail Router can be installed to receive incoming e-mail messages from Exchange Servers. If the E-mail Router fails and is recovered, the E-mail Router component must be reinstalled so that it will continue to identify Microsoft Dynamics CRM e-mail messages as they enter the organization.
1.6 Backing up Microsoft Dynamics CRM Server
Backing up and restoring the Microsoft Dynamics CRM Server basically involves the following data:
• Microsoft Dynamics CRM Server database files (explained previously)
• Microsoft Dynamics CRM Server program files
• Microsoft Dynamics CRM Web site files
• Customizations made to Microsoft Dynamics CRM
By default, all Microsoft Dynamics CRM program files are located in the following folder:
C:\Program Files\Microsoft CRM\
By default, the Microsoft Dynamics CRM Web site files are located in the following folder:
C:\Inetpub\wwwroot
The Export Customizations tool can be used to back up Microsoft Dynamics CRM customizations such as modified forms, views, and mappings. The Export Customizations tool is located in the Customizations area of the Settings area in the Microsoft Dynamics CRM application. It is a good practice to make a backup of your customizations before you try to make changes.
1.6.1 Backing up your Customizations
It's a good idea to back up (Export) your Customizations on a fairly regular basis - after you create or alter any of your Entities, Workflows, etc. This is a very simple process that can make your live easier in the future. If you are just getting started with CRM Live, go ahead and create a baseline export of the pristine system.
1. Navigate to Settings -> Customizations -> Export Customizations.
2. Select More Actions -> Export All Customizations.
3. You may get an Internet Explorer warning. Click Download File.
4. Don't be surprised if your only result is that you go back to your main Workplace screen. Simply repeat steps 1 & 2 above and I expect you will be successful
5. Give the customization.zip file a logical name and save it to a location that has strong backup procedures in place.
2. Failure Recovery
To understand the failure-recovery procedures, you must examine several different scenarios to learn how restoration occurs in each case. For each scenario in this guide, total server failure is assumed. The following four scenarios contain information that shows the steps to ensure successful recovery.
2.1 SQL Server failure
If the computer that is running Microsoft SQL Server fails, you must restore the databases from backup, and then re-associate them with the Microsoft Dynamics CRM deployment.
To recover from this failure, follow these steps:
1. Install Windows Server 2003 or Windows Server 2008, and make sure that the computer is in the same domain as the Microsoft Dynamics CRM Server. In addition, you should use the same database name and disk structure. If you change either of these, you must take additional steps to correctly restore the SQL Server databases.
2. Install SQL Server.
3. If you have a valid backup of the master database, restore that backup. For more information, see Restoring the master Database in SQL Server Books Online.
4. Restore the msdb database. For more information, see Restoring the model and msdb Databases in SQL Server Books Online.
5. Restore the MSCRM_CONFIG and OrganizationName_MSCRM databases. For more information about how to restore databases, see Backing Up and Restoring Databases.
6. If Microsoft SQL Server Reporting Services and the Microsoft Dynamics CRM 4.0 Connector for Microsoft SQL Server Reporting Services are also installed on the instance of SQL Server, restore the ReportServer and ReportServertempDB databases. For more information about how to restore databases, see Backing Up and Restoring Databases.
7. If you restored the MSCRM_CONFIG database, you must run Microsoft Dynamics CRM Server Setup and use the Connect to existing databases option on the Specify Deployment Options page. If you did not restore the MSCRM_CONFIG database and the database is functioning correctly, you use the Import Organization feature in Microsoft Dynamics CRM Deployment Manager to re-associate the organization database with the Microsoft Dynamics CRM system. For more information about how to import an organization, see the Deployment Manager Help.
This scenario is a worst-case situation, that is, total failure of the computer that is running SQL Server. In other circumstances, such as the failure of a disk, you may only have to restore a single database to recover the environment
2.2 Microsoft Dynamics CRM Server failure
Most of the Microsoft Dynamics CRM configuration information is stored on the computer that is running SQL Server. Therefore, the information can be recovered if all, or part, of Microsoft Dynamics CRM Server fails. Registry entries on the Microsoft Dynamics CRM Server are recovered when you run repair or reinstall processes for the Microsoft Dynamics CRM Server and Microsoft Dynamics CRM 4.0 Connector for Microsoft SQL Server Reporting Services.
If the computer that is running Microsoft Dynamics CRM Server fails, follow these steps:
1. Install the operating system on another server and join the same domain as the computer that is running SQL Server.
2. Install Microsoft Dynamics CRM Server. During Setup, you must select Connect to existing databases when you are prompted. If Microsoft Dynamics CRM 4.0 Connector for Microsoft SQL Server Reporting Services was also installed on the computer that failed, install the Microsoft Dynamics CRM 4.0 Connector for Microsoft SQL Server Reporting Services after Microsoft Dynamics CRM Server is completed.
3. If ISV.config and web.config have been changed from their default settings, restore these files from backup.
4. Publish all customizations. To do this, in the Web application, click Settings, click Customization, click Customize Entities, on the Actions toolbar select More Actions, and then click Publish all Customizations.
2.2.1 Uninstall or repair Microsoft Dynamics CRM Server
To remove (uninstall) Microsoft Dynamics CRM Server, on the computer where the application is installed go to Add or Remove Programs, click Microsoft Dynamics CRM Server, click Change/Remove, select Uninstall to remove Microsoft Dynamics CRM Server, and then click Uninstall. Follow the instructions that are on the screen.
Important
The Microsoft Dynamics CRM uninstall process does not remove some components, such as the SQL Server databases, Active Directory groups, or the Microsoft Dynamics CRM Web site. Those components must be removed manually.
For more information about how to remove these components, or how to remove components if Setup cannot successfully remove them, see KB article 946980: How to manually remove the Microsoft Dynamics CRM 4.0 server.
To repair a damaged Microsoft Dynamics CRM Server installation, click Microsoft Dynamics CRM Server, click Change/Remove, select Repair, and then click Next. Follow the instructions that are on the screen.
2.3 Exchange Server failure
The process to restore a Microsoft Exchange Server computer that is used by Microsoft Dynamics CRM depends on the other uses of that instance of Exchange Server. Except for the forward mailbox, Microsoft Dynamics CRM does not directly use Exchange Server mailboxes.
Note
Installing the E-mail Router on a computer that is running Exchange Server is not required.
1. Restore Exchange Server.
2. If the E-mail Router was installed on the computer that is running Exchange Server, reinstall the E-mail Router.
3. Restore the Microsoft.Crm.Tools.EmailAgent.xml file. By default, this file is located in the Drive:\Program Files\Microsoft CRM Email\Service folder. If this file is not available, you must reconfigure the profiles, settings, users, queue, and forward-mailbox information by running the E-mail Router Configuration Manager.
2.4 Active Directory failure
In most environments, it is highly unlikely that Active Directory will fail on its own, because more than one Active Directory domain controller should be installed.
To recover from a failed domain controller, follow these steps:
1. Reinstall the Windows Server 2003 or Windows Server 2008operating system.
2. Perform a system state restore.
Make sure that you have a method for recovering from an Active Directory failure. Regardless of the size of your environment, you should consider having multiple domain controllers with regular backups of the system state. If your backups are not current, any data that belong to Microsoft Dynamics CRM objects in Active Directory will be orphaned in SQL Server and therefore will be unrecoverable. Any changes that are made in Microsoft Dynamics CRM, such as adding new Microsoft Dynamics CRM users or queues, requires that Active Directory is backed up immediately after the change.
One major problem can occur with Active Directory that stops Microsoft Dynamics CRM from functioning. If an administrator unintentionally deletes the organizational unit (OU) that corresponds to a Microsoft Dynamics CRM deployment, it becomes inoperable. Similarly, if any of the OU security groups that are created by Microsoft Dynamics CRM are deleted (such as PrivUserGroup, ReportingGroup, PrivReportingGroup, SQLAccessGroup, or UserGroup), Microsoft Dynamics CRM will no longer function correctly. In either of these events, an authoritative restore of Active Directory restores the deleted OU, and security groups, to their original state.
2.5 Microsoft Dynamics CRM for Outlook failure recovery
Microsoft Dynamics CRM for Microsoft Office Outlook with Offline Access includes functionality that uses Microsoft SQL Server 2005 Express Edition. This enables Microsoft Dynamics CRM users to work offline with data synchronized to SQL Server when Microsoft Dynamics CRM for Outlook with Offline Access is brought online again.
In some cases, Microsoft Dynamics CRM users may want to back up the local SQL Server 2005 Express Edition database. This is especially useful when Microsoft Dynamics CRM users are offline for prolonged periods. The following table indicates different methods that can be used for backing up Microsoft Dynamics CRM for Outlook with Offline Access.
Backup Method ,What to Back Up for Microsoft Dynamics CRM
Offline backup Contents of Microsoft Dynamics CRM data directory.
Default location is:
SystemDrive:\Documents and Settings\UserName\Application Data\Microsoft\MSCRM\Data
On Windows Vista, the default location is:
SystemDrive:\Users\UserName\AppData\Roaming\Microsoft\MSCRM\Data Before you start the backup, make sure that the SQL Server (CRM) service is stopped. Restart the service after the backup is complete.
Online backup using Microsoft tools MSCRM_MSDE.mdf
MSCRM_MSDE_log.LDF
Use the Osql.exe tool that is provided with Microsoft Office Server Extensions.
Online backup using non-Microsoft tools MSCRM_MSDE.mdf
MSCRM_MSDE_log.LDF
Look for tools that are compatible with SQL Server 2005 Express Edition.
If there is a problem with Microsoft Dynamics CRM for Outlook with Offline Access before the user can reconnect to the server, the backup can be used to restore Microsoft Dynamics CRM functionality to the client. Outlook should be in offline mode before you restore the backup. When restored, you can then connect to the Microsoft Dynamics CRM Server (online mode). The data not already on the server will be transferred to the server from the client. Be careful when reconnecting to the server. If you restore from an outdated backup, the existing data on the server may have subsequently changed. However, neither SQL Server 2005 Express Edition nor SQL Server recognizes this fact. Therefore you run the risk of overwriting current data on the server by using older data from the offline client backup.
2009/10/26
Update Rollup 7 for Microsoft Dynamics CRM 4.0
General Details about Update Rollup 7
Update Rollup 7 is cumulative. You do not need to install any previous Update Rollups prior to Update Rollup 7
The Update Rollup 7 download contains updates for the 40 supported Language Packs. Prior to installing the Update Rollup 7 Language pack you must install the original Language pack. If you have Language Packs installed, you should
Download the Update Rollup 7 Language Pack
Install the Update Rollup 7 Language Pack
De-provision the Language Pack
Re-provision the Language Pack
Update Rollup 7 adds support for Windows 7, Windows Server 2008 R2 and SQL Server 2008 R2
Information about how to avoid reboots when installing the CRM Outlook Client can be found in the Update Rollup 4 blog posting. If the Client is being installed via AutoUpdate a reboot will be required because the AutoUpdate code is being updated in Update Rollup 7.
The Update Rollup 7 Client can be deployed before the server is upgraded to Update Rollup 7
The Update Rollup 7 Client cannot be uninstalled because of schema changes made to the offline database. All other Update Rollup 7 components (Server, Language Pack, SRS, Exchange Router, etc) can be uninstalled.
The Update Rollup 7 Client package will be a prerequisite for all future Client Update Rollups. Starting with Update Rollup 8 the client updates will block installation if the Update Rollup 7 Client is not found.
The Update Rollup 7 Client has new prerequisites
An internet connection is required for successful Client installation
Client update installation will take longer than previous URs, so please be patient
Steps to make the Update Rollup 7 Client available via AutoUpdate can be found in the Update Rollup 4 blog posting. Once published the Link and Patch IDs can be found in kb article 971782.
Update Rollup 7 is cumulative. You do not need to install any previous Update Rollups prior to Update Rollup 7
The Update Rollup 7 download contains updates for the 40 supported Language Packs. Prior to installing the Update Rollup 7 Language pack you must install the original Language pack. If you have Language Packs installed, you should
Download the Update Rollup 7 Language Pack
Install the Update Rollup 7 Language Pack
De-provision the Language Pack
Re-provision the Language Pack
Update Rollup 7 adds support for Windows 7, Windows Server 2008 R2 and SQL Server 2008 R2
Information about how to avoid reboots when installing the CRM Outlook Client can be found in the Update Rollup 4 blog posting. If the Client is being installed via AutoUpdate a reboot will be required because the AutoUpdate code is being updated in Update Rollup 7.
The Update Rollup 7 Client can be deployed before the server is upgraded to Update Rollup 7
The Update Rollup 7 Client cannot be uninstalled because of schema changes made to the offline database. All other Update Rollup 7 components (Server, Language Pack, SRS, Exchange Router, etc) can be uninstalled.
The Update Rollup 7 Client package will be a prerequisite for all future Client Update Rollups. Starting with Update Rollup 8 the client updates will block installation if the Update Rollup 7 Client is not found.
The Update Rollup 7 Client has new prerequisites
An internet connection is required for successful Client installation
Client update installation will take longer than previous URs, so please be patient
Steps to make the Update Rollup 7 Client available via AutoUpdate can be found in the Update Rollup 4 blog posting. Once published the Link and Patch IDs can be found in kb article 971782.
2009/10/14
CRM 4.0 System Requirements and Required Components
Microsoft Dynamics CRM requires several software applications and components that work together to create an effective system. Before you install Microsoft Dynamics CRM, use this section for guidance to verify that system requirements are met and the necessary software components are available.
Unless specified otherwise, Microsoft Dynamics CRM supports the latest version and service pack (SP) for all required components, such as Windows Server, SQL Server, Internet Explorer, and Exchange Server.
For the most up-to-date information about system requirements and required components, see the Microsoft Dynamics CRM 4.0 Server Readme.
For more information, see:
Microsoft Dynamics CRM Server hardware requirements
Microsoft Dynamics CRM Server software requirements
Microsoft Dynamics CRM Connector for SQL Server Reporting Services
Microsoft Dynamics CRM E-mail Router software requirements
Microsoft Dynamics CRM for Outlook hardware requirements
Microsoft Dynamics CRM for Outlook software requirements
Microsoft Dynamics CRM Web client software requirements
Microsoft Dynamics CRM Data Migration Manager hardware requirements
Data Migration Manager software requirements
64-bit supported configurations
Language support
Currency support
Unless specified otherwise, Microsoft Dynamics CRM supports the latest version and service pack (SP) for all required components, such as Windows Server, SQL Server, Internet Explorer, and Exchange Server.
For the most up-to-date information about system requirements and required components, see the Microsoft Dynamics CRM 4.0 Server Readme.
For more information, see:
Microsoft Dynamics CRM Server hardware requirements
Microsoft Dynamics CRM Server software requirements
Microsoft Dynamics CRM Connector for SQL Server Reporting Services
Microsoft Dynamics CRM E-mail Router software requirements
Microsoft Dynamics CRM for Outlook hardware requirements
Microsoft Dynamics CRM for Outlook software requirements
Microsoft Dynamics CRM Web client software requirements
Microsoft Dynamics CRM Data Migration Manager hardware requirements
Data Migration Manager software requirements
64-bit supported configurations
Language support
Currency support
Subscribe to:
Posts (Atom)